

How to Spot and Fix Small Tears in Your Pool Enclosure Screen Before They Spread
Your pool enclosure is an investment that enhances your outdoor living space, keeps bugs at bay, and helps maintain a cleaner pool. However, even the highest quality screen materials can develop small tears over time due to weather exposure, accidental impacts, or normal wear and tear. What begins as a tiny, barely noticeable hole can quickly expand into a major problem that requires complete panel replacement if left unaddressed.
At Screening Dunrite, we've seen countless small tears turn into costly repairs because homeowners didn't catch them early or know how to properly address them. This comprehensive guide will teach you how to identify small tears in their earliest stages, understand what causes them, and implement effective DIY repairs that can save you hundreds in professional rescreening costs.
Why Small Tears Become Big Problems
Before diving into detection and repair methods, it's important to understand why small tears deserve your immediate attention:
The Progression of Screen DamageInitial puncture or tear (often just 1/4" or smaller)
Wind stress causes the tear to expand along the screen's weave
UV exposure weakens the surrounding screen material
Further expansion occurs with each weather event
Complete panel failure eventually requires full rescreening
This progression can happen surprisingly quickly—what starts as a pinhole in spring can become a gaping hole by hurricane season, compromising your enclosure's functionality and appearance.
The Cost Implications
Addressing a small tear immediately typically costs under $20 in DIY materials, while waiting until it requires professional panel replacement can cost $150-$300 per panel. For an entire section of your enclosure, costs can easily exceed $1,000.
Common Causes of Screen Tears
Understanding what causes tears helps you both prevent them and identify high-risk areas for regular inspection:
External CausesWindblown debris - Small branches, palm fronds, and even acorns can puncture screens during storms
Lawn maintenance - Stones thrown by lawnmowers or string trimmers
Wildlife contact - Birds, squirrels, and other animals attempting to enter or exit
Falling objects - Tree limbs, toys, or maintenance equipment
Internal CausesPool toys and equipment - Accidental impacts with cleaning poles, floats, or toys
Furniture movement - Patio chairs or tables scraping against screens
Children and pets - Accidental impacts or curious exploration
Improper cleaning - Using harsh tools or excessive pressure when removing debris
Material DegradationUV damage - Florida's intense sunlight weakens screen fibers over time
Chemical exposure - Pool chemicals, especially chlorine vapor
Age-related deterioration - Most screens begin showing vulnerability after 7-10 years
Mold and mildew - Can weaken screen material if left untreated
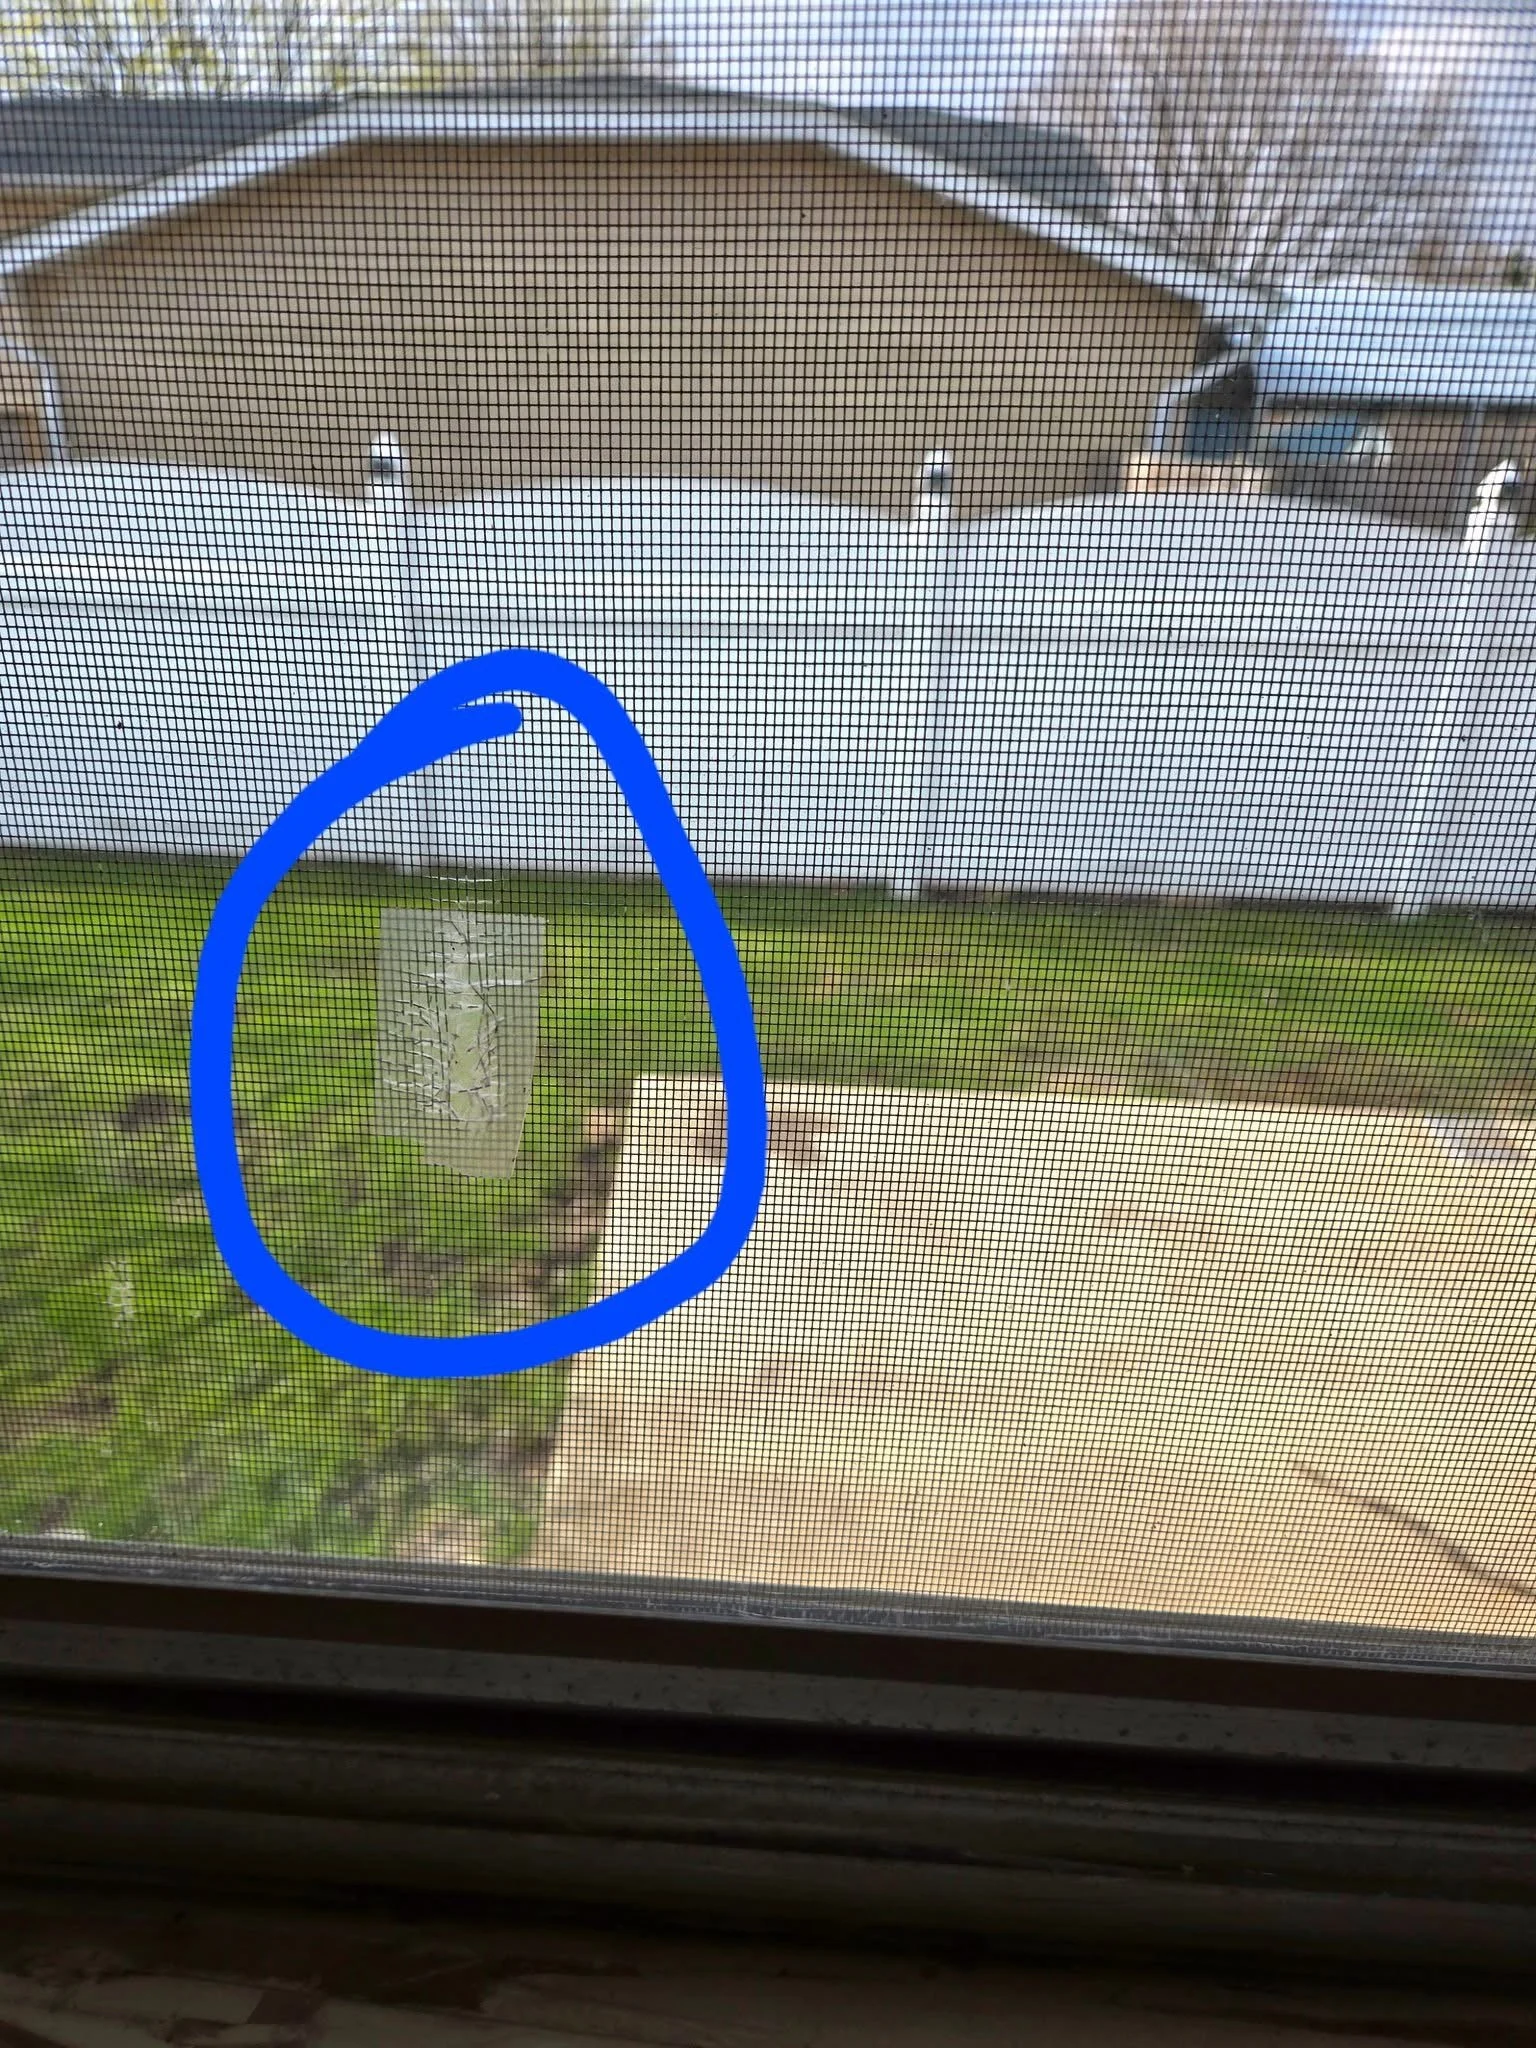
How to Inspect Your Pool Enclosure for Small Tears
Regular inspection is your first line of defense. We recommend a thorough check at least quarterly, with additional quick inspections after storms or high-wind events.
The Ideal Inspection MethodChoose the right time - Early morning or late afternoon when sunlight hits the screen at an angle
Inside-out inspection - Stand inside your enclosure and look for pinpoints of light coming through
Systematic approach - Scan each panel methodically from top to bottom, left to right
Mark discoveries - Use painter's tape to mark small tears for later repair
Document findings - Keep a maintenance log noting locations and sizes of repairs
High-Risk Areas to Focus OnLower panels - Most vulnerable to impacts from lawn equipment and pets
Door adjacent panels - Experience more movement and stress
Roof panels - Subject to falling debris and maximum UV exposure
Corners and edges - Experience more tension and movement
Tools for Better DetectionLED flashlight - Helps spot tiny holes even in daylight
Magnifying glass - For examining suspicious areas more closely
Painter's tape - For marking areas needing repair
Smartphone camera - Take close-up photos to monitor progression over time
DIY Repair Options for Different Types of Tears
The appropriate repair method depends on the size, location, and nature of the tear. Here are effective solutions for various scenarios:
For Pinhole Tears (Under 1/4")
Option 1: Screen Repair Tape
Pros: Extremely easy application, nearly invisible when properly applied
Cons: Less durable in extreme weather, may need replacement annually
Application: Apply to both sides of the screen for maximum adhesion
Option 2: Clear Nail Polish
Pros: Nearly invisible, prevents further tearing, very economical
Cons: Works only on very small holes, requires precise application
Application: Apply small drop to hole, allow to dry, apply second coat if needed
For Small Tears (1/4" to 1")
Option 1: Adhesive Screen Patches
Recommended: Screen Team Patch Kit - $12.99
Pros: Pre-cut patches in various sizes, strong adhesive backing
Cons: More visible than tape on some screen colors, edges may lift over time
Application: Clean area thoroughly, apply patch to both sides when possible
Option 2: Liquid Screen Repair
Recommended: Liquid Screen Repair - $15.99
Pros: Creates flexible, durable repair, nearly invisible when dry
Cons: Requires practice to apply correctly, longer drying time
Application: Follow manufacturer instructions precisely for best results
For Medium Tears (1" to 3")
Option 1: Mesh Patch Kit with Adhesive Frame
Pros: Creates structured repair that resists further tearing, good durability
Cons: More visible than other options, requires careful alignment
Application: Center frame over tear, press adhesive firmly, allow full cure time
Option 2: Spline-Based Patch
Pros: Most durable DIY option, similar to professional repair
Cons: More complex application, requires basic tools
Application: Cut damaged section, insert replacement screen with spline
For Tears Near Spline or Frame
These specialized repairs require different techniques:
Option 1: Spline Reinforcement
Recommended: Spline Repair Kit - $16.99
Pros: Addresses root cause of edge tears, prevents recurrence
Cons: Requires removing and reinstalling spline
Application: Remove old spline, replace damaged section of screen, install new spline
Option 2: Frame Edge Reinforcement
Recommended: Edge Binding Tape - $14.99
Pros: Strengthens vulnerable edges, prevents further separation
Cons: Visible repair, may affect door operation if used near moving parts
Application: Clean frame edge thoroughly, apply tape along edge, press firmly
Step-by-Step Repair Guides
Pinhole Repair Using Screen TapeClean the area - Use isopropyl alcohol on a cotton ball to remove dirt and oils
Cut appropriate size - Cut tape at least 1/2" larger than the hole on all sides
Apply to first side - Center over hole, press firmly from center outward
Apply to second side - Repeat on opposite side for maximum strength
Press and seal - Use a credit card edge to remove air bubbles and ensure adhesion
Small Tear Repair Using Adhesive PatchSelect proper patch size - Choose patch at least 1/2" larger than tear on all sides
Clean thoroughly - Use alcohol wipe included in kit
Align fibers - Gently push torn edges together to align screen pattern
Apply patch to first side - Remove backing, center over tear, press firmly
Apply second patch - Repeat on opposite side, ensuring perfect alignment
Cure time - Allow 24 hours before exposing to moisture or touching
Medium Tear Repair Using Frame KitPrepare the area - Clean thoroughly and allow to dry completely
Trim any loose threads - Use small scissors to remove frayed edges
Apply adhesive - If not pre-applied to frame, add thin layer to frame edge
Position frame - Center over tear, ensuring complete coverage
Press firmly - Apply even pressure around entire frame edge
Allow to cure - Follow manufacturer's recommended cure time (typically 24-48 hours)
Edge Tear Repair Using Spline MethodRemove old spline - Use needle-nose pliers to carefully extract spline near tear
Cut replacement screen - Cut piece 2" larger than damaged area on all sides
Position new screen - Overlap with existing screen, ensuring tight fit
Install new spline - Use spline roller to insert spline, securing new screen
Trim excess - Carefully trim excess screen material with utility knife
Test tension - Ensure repair is taut and secure
Preventative Measures to Avoid Future Tears
Physical Barriers and ProtectionsChild and Pet Barriers - Consider temporary barriers for areas accessible to children and pets
Recommended: Adjustable Screen Guard - $39.99
Pros: Prevents common low-panel damage, removable when not needed
Cons: Affects appearance, requires installation
Landscaping Adjustments - Maintain safe distance between plants and screens
Create buffer zones between screen walls and landscape elements
Trim branches that could contact screens during wind
Furniture Placement - Keep furniture at least 6" from screens
Use furniture stoppers to prevent accidental contact
Consider felt pads on furniture legs that might contact screens
Maintenance PracticesGentle Cleaning Routine - Use appropriate cleaning methods
Soft brush attachments on extension poles
Gentle hose spray rather than pressure washing
Work from top to bottom to avoid debris accumulation
Regular Inspection Schedule - Create calendar reminders for quarterly checks
Spring (pre-pollen season)
Summer (pre-hurricane season)
Fall (post-hurricane season)
Winter (during dormant period)
Prompt Repairs - Address small issues immediately
Keep repair supplies on hand
Document repairs to track problem areas
Material Upgrades
When it's time for full rescreening, consider upgraded materials that offer better tear resistance:
Pet Screen - 7x stronger than standard screen
Recommended: Phifer Pet Screen - Professional installation recommended
Pros: Exceptional tear resistance, ideal for homes with pets or children
Cons: Slightly reduced visibility, higher cost than standard screen
Super Screen™ - 3x stronger than standard screen
Recommended: Twitchell Super Screen™ - Professional installation recommended
Pros: Excellent tear resistance while maintaining good visibility
Cons: Premium price point, specialized installation
TuffScreen™ - Specialized high-strength material
Recommended: Phifer TuffScreen™ - Professional installation recommended
Pros: Superior puncture and tear resistance, 10+ year lifespan
Cons: Highest cost option, may require professional installation
When to Call a Professional
While many screen repairs can be handled as DIY projects, certain situations warrant professional attention:
Complex Damage ScenariosTears larger than 6" in length
Multiple tears in a single panel
Damage at critical structural points
Tears combined with frame damage
Accessibility IssuesRepairs on high roof panels
Areas requiring specialized equipment to reach
Repairs near electrical fixtures or complex frame sections
Material ConsiderationsSpecialty screens (solar, privacy, or insect-specific)
Older screens that may be brittle or degraded
Screens under warranty (DIY repairs may void coverage)
Professional Services from Screening Dunrite
For repairs beyond DIY scope, our Screen Repair Service provides:
Free evaluation and estimate
Specialized repair options for all damage types
Warranty-backed workmanship
Fast turnaround to minimize exposure
For DIY enthusiasts wanting to learn proper techniques, our DIY Pool Enclosure Maintenance Course includes detailed video instruction on screen repair methods, helping you develop professional-level skills for ongoing maintenance.
Conclusion
Small tears in your pool enclosure screen don't have to lead to expensive repairs. With regular inspection, prompt attention to minor damage, and the right repair techniques, you can maintain your enclosure's appearance and functionality while extending its lifespan.
Remember that the key to successful screen maintenance is early detection and immediate action. By incorporating quarterly inspections into your home maintenance routine and keeping basic repair supplies on hand, you'll be prepared to address small tears before they become major problems.
For professional assistance with screen repairs or to learn more about our comprehensive pool enclosure services, visit www.screeningdunrite.com or contact our team of experts directly.
⸻
This article was written by the experts at Screening Dunrite, Florida's trusted pool enclosure specialists since 2010. For more information about our services or to schedule a repair consultation, visit www.screeningdunrite.com.
⸻
Keywords: pool enclosure screen repair, fix screen tears, screen patch kit, DIY screen repair, pool cage screen damage, small screen tear repair, screen maintenance, Florida pool enclosure repair, prevent screen damage, pool screen patch